Tufting Blog
How to Secure Tufting Fabric to the Hoop?
For tufting projects, correctly securing the fabric to the hoop is a critical step for a successful outcome. Insufficient fabric tension can result in uneven designs and poor thread retention. In this guide, we'll explain step-by-step how to secure your tufting fabric to the hoop. 1. Required Materials Tufting fabric (Monk's Cloth, polyester, or burlap) Wooden or metal hoop/frame Staple gun (manual or electric) Staples (10-12 mm recommended) Hammer (if necessary) Scissors Thread clamp tape (optional, for extra tension) 2. Preparing the Hoop and Fabric Step 1: Place your hoop on a flat surface. The tufting hoop can be made of wood or metal and should be appropriate for the size of your project. Step 2: Lay your tufting fabric on the hoop. The fabric should be placed so that it extends 5-10 cm beyond the hoop on all sides. This allows the fabric to stretch more easily. 3. Securing the Fabric to the Hoop Step 3: Pin the first edge of the fabric. Using a staple gun, secure one edge of the fabric to the hoop. Space the staples approximately 5-7 cm apart. Make sure the fabric is straight and not twisted. Step 4: Secure the fabric by stretching it from the opposite edge. Tighten the fabric and pin it to the opposite side of the hoop. It's very important that the fabric is flat and taut. Space the staples evenly. Step 5: Secure the other two edges in the same way. Staple the fabric, stretching it each time. Make sure all edges are equally taut. 4. Fixing the Corners Step 6: Fold the corners to secure. Fold the fabric corners neatly and secure them to the hoop. Trim or staple any excess fabric to the corners. Step 7: Increase the tension. To ensure the fabric is securely fastened to the hoop, you can gently tap the staples with a hammer. This will help the staples set deeper. 5. Control and Correction Step 8: Check the tension of the fabric. The fabric should be taut enough to make a hollow sound against the hoop. If the tension is not sufficient, remove the staples and re-tension the fabric. Step 9: Trim off excess fabric. Once the tufting is complete, you can complete your project by trimming the excess fabric behind the hoop. 6. Extra Tips Make the Fabric Non-Slip: You can prevent the fabric from slipping by adding thread-holding tape to the edges of the hoop. Second Layer: You can provide extra durability by adding a thin cotton cloth under the fabric. Hoop Selection: For larger projects, choose more durable and thicker hoops. When tufting projects, correctly securing the fabric to the hoop improves the quality and ease of work. With the correct tension and securing techniques, you can achieve a flawless tufting experience. By carefully following these steps, you can achieve the best results in your projects.
Learn moreThreads Are Falling Out of My Tufting Carpet: How to Fix It?
Because tufted rugs are handmade and custom-designed, you may occasionally encounter issues such as thread shedding. These issues can be caused by a variety of factors, including incorrect techniques, inadequate fastening, or poor quality materials. But don't worry; there are simple solutions to prevent thread shedding and restore your rug to its original shape. 1. Common Causes of Thread Loss 1. Insufficient Adhesive Use If not enough adhesive (latex or carpet glue) has been applied to the back of the carpet, the threads may loosen over time. 2. The fabric is not tight enough If the fabric is not kept sufficiently taut during tufting, the threads may not be fully secured. 3. Using Poor Quality Yarn Thin or low-quality threads may shed over time in frequently used areas. 4. Overuse and Friction If your carpet is in a heavily used area, wear and tear of the threads may be inevitable. 5. Not Fixing Cut Threads When making cut pile carpets, not securing the cut threads sufficiently may lead to shedding. 2. Methods to Stop and Repair Thread Loss 1. Reinforce the Back of the Carpet Apply a thin layer of carpet glue or latex adhesive to the back of your rug. Spread the adhesive evenly, making sure all the threads are secured. Leave the carpet on a flat surface until the adhesive dries (24 hours is ideal). 2. Fill in the Blanks If gaps have formed in the spilled areas, make small touches using yarn in the same color. You can complete the missing areas by passing the thread through the fabric with a tufting gun or by hand. 3. Reinforce the Edges Sew felt or cotton fabric around the edges of the rug for extra support. This will reduce shedding. 4. Secure the Threads Secure any loose or protruding threads on the front surface of the rug with a light coat of glue or latex. Be careful not to over-apply glue. 5. Trim Excess Threads Some of the loose threads may remain on the surface of the carpet. Carefully trim these excess threads using sharp scissors. 3. Advanced Measures 1. Add a Non-Slip Sole By adding a non-slip base under your rug, you can reduce yarn shedding and ensure your rug remains more stable. 2. Get Professional Support If there is a major spill or deformation, you can request a professional solution by consulting a carpet repairman. 3. Perform Regular Maintenance Vacuum your carpet regularly, but use a low-power vacuum. High suction can pull out fibers. 4. Tips to Prevent Yarn Shedding Always keep the fabric taut during the tufting process. Get a more durable rug by using quality yarn and materials. Don't be afraid to apply a generous amount of adhesive to the back of the rug. Be careful when using your carpet in high-traffic areas. Thread shedding in tufted carpets can be resolved with regular maintenance and proper repair techniques. By following these simple methods, you can extend the life of your carpet and maintain its aesthetic and functionality. Early detection of thread shedding is the best way to extend the life of your carpet.
Learn moreHow to Use a Tufting Gun: A Step-by-Step Guide (For Beginners)
The tufting gun is one of the most critical tools in the art of tufting, enabling you to bring your creative projects to life. However, using this tool correctly is crucial for both efficiency and safety. In this guide, we'll walk you through the process of selecting and using a tufting gun. 1. Choosing a Tufting Gun Choosing a tufting gun is a critical step in determining the quality and ease of your project. Here are some factors to consider: a) Types of Guns: Cut Pile Tufting Gun : Gives the carpet a plush texture by cutting the yarn. Creates a fluffier and softer surface. Loop Pile Tufting Gun : Leaves the yarn in a loop shape without cutting it. Provides a more durable and hard surface. Combination Guns : These models offer both cut pleat and loop pleat functions. They are ideal for more flexible projects. b) Power Source: Electric : More powerful and faster, ideal for large projects. Manual : Sufficient for small projects, quiet and portable. c) Weight and Ergonomics: The weight of a tufting gun affects fatigue during prolonged use. Lightweight and ergonomic designs are preferred. 2. Required Materials Before you begin using the tufting gun, prepare the following materials: Tufting Fabric (Primary Fabric) : A type of perforated and flexible fabric. Hoop or Frame : Keeps the fabric taut. Yarn : Wool, cotton or acrylic yarn suitable for the project. Tufting Gun Scissors Adhesive (Latex or carpet glue) Protective Glasses and Gloves (Optional) 3. Using a Tufting Gun Step by Step Step 1: Stretching the Fabric Using the hoop or frame, stretch your tufting fabric tightly. Fabric tension is critical for a smooth finish. Step 2: Transferring the Pattern to the Fabric Trace your pattern template onto the back of the fabric. A clear pattern makes the process easier. Step 3: Threading the Gun Thread the thread through the thread guide system on the top of the tufting gun. Position the thread as instructed in the gun's manual. Step 4: Begin the Tufting Process Hold the gun perpendicular to the fabric. Gently pull the trigger and slowly push the gun forward. Move the gun at a steady, even speed. This will create loops or cuts on the back of the fabric. Step 5: Fill in the Blanks Once you've completed the pattern, fill in the remaining spaces. You can enrich your patterns with different colors or types of yarn. Step 6: Securing the Back Once the tufting is complete, coat the back with glue or latex. This will help secure the threads and extend the life of the carpet. 4. Tufting Gun Usage Tips Be slow and careful : Be patient with your first attempts. Pushing the gun too quickly into the fabric can result in uneven stitches. Check the Fabric : Make sure the fabric is not loose. Consistent tension ensures a smooth finish. Safety Precautions : The tufting gun may have sharp edges. Be sure to wear protective gloves and eye protection when using it. 5. Troubleshooting Gun Jams : The thread may be jammed. Turn off the gun and check the thread. Uneven Threads : Check if the fabric is taut enough and move the gun at a constant speed. Gaps Remain : If the yarn is not dense enough, fill in the gaps by going over a second layer. Using a tufting gun becomes easier and more fun with practice. Be patient with your first projects and don't be afraid to get creative. By creating your own designs, you can create rugs, pillows, and wall hangings that are both artistic and functional.
Learn more7 Common Mistakes in Tufting Carpet Making and Solutions (For Beginners)
While tufting is a great way to showcase your creativity, it can present some challenges, especially for beginners. Mistakes made during the rug-making process can lead to less-than-expected results. In this article, we'll cover the seven most common mistakes made when making a tufted rug and how to fix them. 1. The fabric is not tight enough Mistake: When the tufting fabric is not fully stretched across the hoop or frame, the loops will not place properly and your design may be ruined. Solution: Stretch your fabric tightly around the hoop and secure it. The fabric shouldn't be too loose or too stiff. It should be taut enough to make a slight clicking sound. For larger projects, consider a sturdier frame. 2. Wrong Yarn Selection Mistake: Using threads that are not suitable for tufting will cause the carpet to wear out quickly or the threads to become unstable. Solution: Use thick yarns made specifically for tufting projects, such as wool, acrylic, or cotton. Avoid cheap or thin yarns. High-quality yarns will extend the life of your carpet. 3. Improper Use of the Tufting Gun Mistake: Holding the gun at the wrong angle to the fabric or moving it too quickly can cause uneven stitches. Solution: Work with the tufting gun perpendicular to the fabric and move at a steady speed. Slow and controlled progress results in a more even finish. Practice on a small area before using the gun. 4. Not Fixing the Threads Mistake: If glue is not applied to the back after the tufting is completed, the threads will fall out or become loose over time. Solution: After the tufting process is complete, secure the threads by applying carpet glue or latex adhesive to the back of the carpet. Be sure to spread the adhesive evenly and allow it to dry thoroughly. 5. Incorrect Transfer of the Pattern Error: Drawing or transferring the pattern to the fabric incorrectly will result in a damaged design. Solution: When transferring a design, carefully trace the design onto the fabric using a projector, carbon paper, or clear paper. Be extra careful with large or complex designs and double-check the design before pinning it. 6. Threads Too Tight or Loose Fault: Threads that are too tight or too loose will cause the stitches to appear uneven. Solution: When tufting, make sure the gun applies even pressure to the fabric. If the thread is too tight, loosen the hoop; if it's too loose, re-tension the fabric. 7. Inadequate Use of Base Material Mistake: Using insufficient or incorrect material on the back of the carpet will cause the carpet to slip or become deformed. Solution: Add felt or thick cotton fabric to the back of the rug. This increases its durability and prevents slipping. Choosing quality backing materials can ensure long-term use. Bonus: Extra Tips for Tufting Project Success Perform Regular Maintenance : Clean and maintain your carpet regularly. Start with Small Projects : Get practice by working on small projects at first. Get Inspired : Develop new ideas by examining different tufting projects. By avoiding these common mistakes when tufting, you can create higher-quality, more durable rugs. By working patiently and carefully, you can improve your skills with every project. Happy tufting!
Learn moreHow to Choose Tufting Fabric (For Beginners)
The fabric used in tufting projects plays a critical role in the quality and durability of the final product. Choosing the right fabric allows the threads to flow smoothly and helps the design emerge as intended. In this guide, we'll walk you through the key points to consider when choosing tufting fabric. 1. The Importance of Tufting Fabric During the tufting process, the gun pushes the thread through the back of the fabric, creating loops or cuts. Improper fabric structure can cause the threads to become unstable or distort the design. Therefore, choosing the right fabric makes a big difference for every project. 2. Types of Fabric Used for Tufting 1. Monk's Cloth Features : It is a type of perforated fabric that is soft, flexible and specially produced for tufting. Advantages : The thread passes easily, is durable and provides professional results. Usage Area : Carpets, wall panels, pillows. 2. Linen Features : It is produced from natural fibers, flexible and durable. Advantages : Provides a natural look, holds the threads well. Area of Use : Wall decorations and small-sized projects. 3. Burlap (Burlap) Features : Economical and easy to find. Hard and coarse texture. Advantages : Cost-effective for entry-level projects. Disadvantages : It can wear out easily and sometimes it may not hold the threads well. Area of use : Small decorative pieces, practice. 4. Polyester Tufting Fabric Features : It is a synthetic and durable fabric type. Advantages : It is long-lasting and does not stretch. Area of Use : Large carpet projects and professional works. 3. Things to Consider When Choosing Fabric 1. Hole Size Ideal Hole Size : The tufting gun needle should pass through the fabric easily. If the holes are too small, the thread will struggle; if they are too large, the thread will not stay in place. Suggestion : Choose Monk's Cloth with medium-sized holes. 2. Flexibility and Durability The fabric should not be too stretchy. Stretchy fabrics can cause the design to become distorted. For large projects such as carpets, thick and durable fabrics should be preferred. 3. Stretching the Fabric The fabric should not be deformed when stretched on a hoop or frame. It should remain taut and flat. 4. Testing the Fabric Before purchasing fabric, test a small piece using a tufting gun. Observe how the threads hold up in the fabric. 5. Where Can You Find the Best Fabric? Local Hobby Shops : You can find fabrics made specifically for tufting. Online Platforms : Tufting fabrics are available on platforms such as Etsy and Amazon. Companies Selling Carpet Production Materials : They offer a variety of fabrics at a professional level. Choosing the right fabric is essential for success in tufting projects. Fabrics specifically designed for tufting, such as Monk's Cloth, ensure the best results for your projects. When choosing fabric, consider flexibility, hole size, and durability, and choose the material that best suits your project. Remember, the right fabric means the right result!
Learn moreWhat Materials Are Required for Tufting? Starter Kit Preparation (For Beginners)
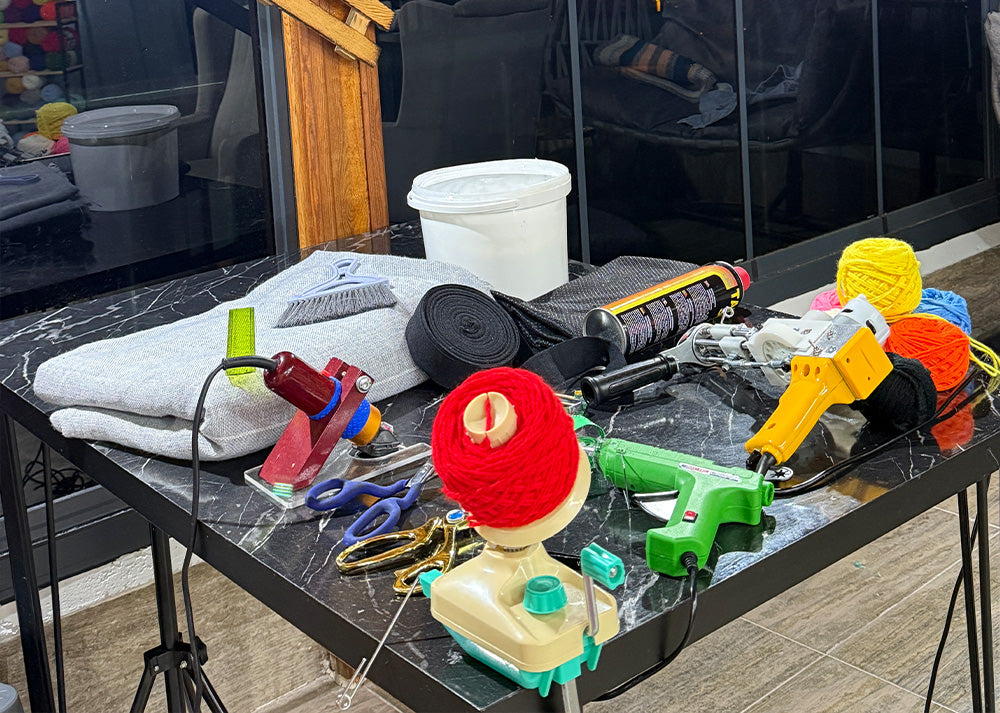
Tufting is a fun and rewarding craft where you can unleash your creativity and create your own rugs, pillows, or wall decor. However, it's crucial to have the right materials before you begin. In this guide, you'll find the essential supplies you'll need to get started in the world of tufting, along with tips for getting started with a starter kit. 1. Basic Materials Required for Tufting 1. Tufting Gun Cut Pile Tufting Gun : Creates plush and soft surfaces by cutting the yarn. Loop Pile Tufting Gun : Leaves the thread in a loop shape without cutting it, ideal for harder and more durable surfaces. Combined Models : These are flexible models that can be used as both cut pleat and loop pleat. For beginners, loop pile guns are easier to control. 2. Tufting Fabric (Primary Fabric) Monk's Cloth : The most common type of fabric used for tufting. Burlap (Burlap) : May be a more economical option, but has less durability. Polyester Tufting Fabric : More robust and durable. The tufting fabric should be perforated and flexible, allowing the threads to pass through easily. 3. Pulley or Frame Wooden Hoop : Holds the fabric steady by stretching it tightly. Metal Frame : More durable, suitable for larger projects. DIY Frame : It can be easily made at home. The size of the hoop should be chosen according to the size of the project you will be doing. 4. Yarn (Wool, Cotton or Acrylic) Wool Yarns : Provides a thick, durable, soft texture. Cotton Yarns : Suitable for natural, light, fine textures. Acrylic Yarns : Offers affordable, vibrant color options. Quality threads increase the durability of your carpet and provide a more aesthetic appearance. 5. Adhesive (Latex or Carpet Glue) Latex Adhesive : Ensures that the threads remain fixed. Carpet Glue : It is a thicker and more durable adhesive. After the tufting process is completed, glue should be applied to prevent the threads from shedding. 6. Back Base Material (Felt or Fabric) Felt : Soft and durable, widely used as the back base. Cotton or Fabric : Thinner and lighter bases can be chosen for wall panels. 7. Scissors and Trimming Tools Sharp Scissors : Used to cut the thread neatly. Electric Carpet Cutter : Provides faster and smoother cutting in large projects. 2. Starter Kit Recommendations Basic List for the Starter Kit: 1 tufting gun (cut or loop pile) 1 meter of tufting fabric 1 pulley or frame 4-5 different colors of yarn (wool or acrylic) 1 piece of adhesive (latex or carpet glue) 1 felt back base 1 pair of scissors 3. Extra Materials for Tufting (Optional) Pattern Templates : Used to draw patterns on fabric. Projector or Transparent Paper : To transfer patterns onto fabric. Gloves and Goggles : Protective equipment for safe work. Lighting : A good light source to see details. 4. Beginner Tips Start with Small Projects : Get practice by making pillows or small wall panels for your first projects. Use Quality Materials : Using quality materials in your first attempts will increase your motivation. Be patient : Tufting is an art that requires practice. Your dexterity will improve over time. Choosing the right materials for tufting is the first step to achieving a successful result. With a good starter kit, you can jumpstart your creative projects and create your own style in the world of tufting. Happy tufting!
Learn moreWhat is Tufting? Beginner Level (For Beginners)
What is Tufting? As interest in handmade products has rapidly increased in recent years, we've begun to hear the term "tufting" frequently among creative hobbies. So, what exactly is tufting? How is it done, and why has it become so popular? In this article, we'll explore the art of tufting in detail. What is Tufting? Tufting is a craft in which wool or cotton threads are threaded onto a fabric base using a needle or special machine to create a pattern. It is typically used to make carpets, rugs, or wall panels. This technique can be done by hand or using a specialized device called a tufting gun. Tufting is a technique that has been around since the mid-20th century, but in recent years, the rise of DIY (do-it-yourself) projects has attracted more attention. Colorful and creative tufting projects, particularly those shared on platforms like Instagram and TikTok, have brought this art form to a wider audience. How is Tufting Done? Tufting is a creative process, and some basic materials are needed to get started. Here's what you'll need and the step-by-step process: Required Materials: Tufting Gun: Used to thread the thread onto the fabric. Tufting Fabric: It is a type of perforated fabric specially designed for tufting. Yarn (Wool, Cotton etc.): Yarn is preferred according to pattern and color selection. Hoop or Frame: Used to secure the fabric. Scissors: Required for cutting threads. Adhesive: It is used to fix the threads after the tufting process is completed. Cloth or Felt (For the Base): It is added to smooth the back of the carpet. Tufting Process Step by Step: Pattern Selection: First, the pattern to be created is determined. You can create your own design or download a ready-made template from the internet. Stretching the Fabric: The tufting fabric is stretched and fixed on the hoop. Pattern Drawing: The selected pattern is drawn on the fabric. Tufting Process: Using a tufting gun, thread is passed over the design. This process continues with different colors and threads. Fixing: After the process is completed, glue is applied to the back surface to fix the threads. Cutting and Correction: Excess threads of the carpet are cut and corrections are made. Adding the Back Base: Finally, a material such as felt or fabric is added to the back. Advantages of Tufting Personalization: You can create your own designs and create decorative products that are completely unique to you. Therapeutic Effect: The repetitive and focused process of tufting can be a stress-relieving hobby. Additional Income Source: Handmade carpets and panels offer the opportunity to generate income by selling them. Aesthetic Contribution: You can create unique pieces that will add color and character to your spaces. Things to Consider When Tufting Quality of Fabric: The fabric used for tufting must be sufficiently durable and flexible. Tufting Gun Usage: The tufting gun should be used with care and attention should be paid to safety. Thread Selection: Quality threads provide more durable and long-lasting results. Time and Patience: Tufting is a process that requires time and patience. Your first attempts may not be perfect, but you can improve with practice. What can be done with tufting? Tufting can be used to make many different products. Here are some projects you can make with tufting: Carpets: You can make carpets in different colors and patterns. Wall Panels: You can create artistic wall decorations and panels. Pillows: You can design decorative pillows using the tufting technique. Bags: Different and creative bag designs are possible. Furniture Coverings: Projects such as pouf or chair coverings can also be done. The Popularity and Future of Tufting Tufting is being discovered by more and more people every day thanks to the influence of social media. Especially during the pandemic, as people spent more time at home, they sought out creative hobbies. During this time, tufting has emerged as both a fun and productive hobby. Tufting is expected to become even more widespread in the future through workshops, courses, and online training. Furthermore, as trends in personalized design and decoration increase, the art of tufting is likely to continue to grow in popularity. Tufting is not just a hobby; it's a creative and aesthetic art form. The joy of making something with your own hands and the unique products that result make this art even more appealing. You too can step into the world of tufting and bring your own designs to life.
Learn more
