Tufting Blog


My Tufting Gun Isn't Working: The Ultimate Troubleshooting Guide
While your tufting gun is the heart of your projects, it is a mechanical and electrical tool that can sometimes get "temperamental." Pressing the trigger and not hearing that familiar hum can be stressful, but don't worry. In this comprehensive guide, backed by GG Tufting technical expertise, we cover the most frequent malfunctions and professional DIY solutions you can apply at home, step-by-step. ⚡ Safety First: Before checking internal parts, cleaning, or attempting any repairs, ensure that you have unplugged the gun from the power outlet. 🔍 Quick Diagnosis Table Symptom Possible Cause First Aid No Light / No Sound Power Source / Cable Check outlet and adapter connection. Motor Runs, Needle Won't Turn Gear Jam Turn off, rotate gears manually. Not Cutting Yarn (Cut Pile) Scissor Adjustment Adjust the scissor closer piece. Fabric Tearing Tension / Pressure Tighten fabric, increase pressure. 🔌 1. Gun is Completely Dead (No Power) ⚠️ Possible Causes Usually simple issues related to the adapter, cable breaks, or the outlet. Solution Steps: Adapter Light: Check the LED light on your power brick/adapter. If it's off, the issue is the outlet or the adapter itself. If it blinks, there may be a loose contact. Cable Check: Gently wiggle the cable where it enters the gun handle. If the machine starts and stops momentarily, there is an internal wire break. Fuse: Rarely, a sudden voltage spike may have blown the internal fuse. 🧶 2. Yarn is Jamming or Falling Out ⚠️ Possible Causes This is often a "yarn feeding" error rather than a machine fault. Solution Steps: Yarn Path: Ensure the yarn is threaded correctly through the top loop and the needle eye. Cone Tension: Is your yarn cone spinning freely? If the yarn snags, the needle struggles to pull it, causing it to fall out. Always ensure loose tension (we recommend "Cake Winding"). Yarn Thickness: Very thick yarns can get stuck in the needle eye. Use yarn thickness compatible with your gun's gauge. ⚙️ 3. Slowing Down, Stuttering, or Excessive Noise If your machine doesn't "flow" like it used to or makes grinding noises, it's time for maintenance. 🛢️ 5-Minute Maintenance Routine Clean and apply sewing machine oil to the following points: 💧 Top & Bottom Rails 💧 Rotating Gears 💧 Scissor Mechanism Solution Steps: Cleaning: Use a brush or compressed air to remove yarn dust from the motor area. This dust can clog the gears. Screw Check: Vibrations cause screws to loosen over time. Tighten all visible screws (especially those holding the body) with an Allen key. 🧵 4. Yarn Won't Stay in the Cloth (Falling Out) You pull the trigger, but the yarn doesn't stick in the fabric; it just pulls back out. This is frustrating but fixable. ⚠️ Possible Causes Insufficient Pressure: You aren't pushing the gun hard enough against the fabric. The foot of the gun must always be in firm contact with the cloth. Loose Fabric: If your cloth isn't "drum-tight" on the frame, the needle will bounce, and the fabric will flex, failing to grab the yarn. Retighten your cloth. Dull Needle/Scissors: If the needle tip or scissors are dull, they won't cut cleanly and will pull the yarn back out. ✂️ 5. Gun Isn't Cutting (Acting like Loop Pile) If your Cut Pile gun isn't cutting the yarn, there is an issue with the scissor mechanism. 💡 Expert Tip: The Scissor CloserAt the front of the machine, there is a small metal piece that the scissors hit to close. If this piece shifts even a millimeter, the scissors won't close, and the yarn won't be cut. Adjust this piece slightly toward the scissors to ensure contact. Solution Steps: Scissor Replacement: Scissors are consumable parts. If they are dull, replace them rather than trying to sharpen them. Timing Adjustment: Check the opening and closing timing of the scissor mechanism. 🔘 6. Trigger is Stuck or Unresponsive Dust may have accumulated inside the trigger mechanism, or the spring may be faulty. Unplug the gun and use compressed air to clean the trigger area. Check if the trigger spring has popped out of place. If it still doesn't work, the internal switch might be broken and may require technical service. Preventative Maintenance Saves Lives Brush off your gun after every project. Apply a drop of oil every 4-5 hours of operation. Be careful not to drop the gun; precision alignments can be easily thrown off. Keeping your tufting gun running smoothly increases the quality and speed of your projects. By following this guide, you can easily solve potential problems and keep your production process uninterrupted.
Learn more
How to Prepare Custom Tufted Rugs for Sale (Advanced Guide)
Tufted rugs are decorative pieces that stand out with their personal touch and handmade aesthetic. Selling these unique rugs can be both a creative outlet and a profitable business opportunity. However, the transition from hobbyist to professional seller requires detailed preparation and strategy. With competition rising on platforms like Etsy, Instagram, and Shopify, how can you elevate your products to a "Premium" level and get them market-ready? Here is the advanced sales guide powered by GG Tufting expertise. 🧶 1. Material Selection for Premium Perception The quality and selling price of your tufted rug are directly related to the materials used. The customer must feel the quality the moment they touch it. Yarn Selection Acrylic yarn is great for hobbies, but for high-ticket sales, choose 100% Wool or high-quality Cotton blends. Wool is the key to the "Premium" label. Professional Backing Instead of simple felt, achieve a professional finish by using non-slip backing or industrial-standard "Action Back" fabrics. Strong Adhesive Use Liquid Latex that remains flexible and odorless. Cheap glues crack and shed over time, leading to customer returns. 🎨 2. Unique and Niche Designs Instead of making "popular characters" that everyone else does, create a collection that carries your own signature. Trend Analysis: Follow rising decor trends on Pinterest and Instagram (e.g., Wabi-sabi, Retro Futurism), but interpret them rather than copying. Capsule Collections: Create mini-series of 3-5 complementary pieces (e.g., an "Ocean Breeze" series). Product Range: Don't just sell floor rugs; offer "entry-level" products like Mug Rugs (coasters), Mirror Frames, and Wall Hangings at more accessible price points. ✂️ 3. Carving & Quality Control The biggest difference between a professional rug and amateur work is the "Carving" (Shearing/Trimming) process. 🔍 Pre-Shipment Checklist: Crisp Lines: Are color transitions sharply defined using scissors or clippers (V-Cut)? Surface Leveling: Has the entire rug been sheared to an even height? Edge Finishing: Are the backing edges turned flawlessly (Waterfall method) or bound correctly? Cleaning: Have all lint, dust, and yarn scraps been removed with a strong vacuum/lint roller? 📸 4. Product Photography: Your Storefront In online sales, the customer cannot touch the product, they can only see it. Your photos must "shout" quality. Lighting: Never use flash. Shoot in natural daylight without harsh shadows. Detail (Macro): Include close-up shots showing the texture of the rug, yarn quality, and carving details. Scale & Styling: Always include "Lifestyle" photos with furniture, a vase, or a person to show the rug's size and scale. 💰 5. The Right Pricing Strategy Don't be emotional; be mathematical. To avoid losses and build a sustainable business model, use this formula: PRO SALES FORMULA Material Cost + (Your Labor x Hours) + Platform Fees + 20-30% Profit Margin *The profit margin is used to grow your business and buy new equipment. 🚀 6. Sales Platforms & Marketing Etsy / Shopify Etsy is the best marketplace for handmade goods. It has a ready-made audience, but account for their fees. Shopify is great for brand building. Instagram / TikTok "Process Videos" (Making-of) have huge viral potential. Customers love watching the effort behind the rug. 🎁 7. Unboxing: Building Loyalty Packaging is part of marketing. Your customer should feel special when opening the box. 1. ProtectionWaterproof poly mailer & bubble wrap. 2. BrandingBranded tissue paper & stickers. 3. Personal TouchHandwritten thank you note & care card. 4. SurpriseA small freebie (e.g., a coaster). 💡 Pro Tip: Share photo reviews from your customers (User Generated Content) on your social media. This is the strongest "Social Proof" for new customers. Preparing your tufted rugs for sale requires the right planning and creativity. This process is not just about making a sale, but about building your brand journey.
Learn more
Mastering Tufting: DIY Rugs, Pillows, and Wall Art (Advanced Guide)
Tufting goes far beyond just making floor rugs! You can take this creative art to the next level with projects like plush pillows, massive wall hangings, mirror frames, and decorative furniture upholstery. Tufting projects are the most modern way to add a personal touch to your living space. In this post, you will find "Master Class" level tips for creating pillows, rugs, and wall art using GG Tufting materials. 🛋️ 1. DIY Tufted Pillows Tufted pillows add a luxurious vibe to your living room with their unique tactile structure. Unlike standard printed pillows, a tufted pillow is a piece of 3D art. REQUIRED MATERIALS: Tufting Gun (Cut/Loop) Tufting Cloth & Yarn Poly-Fil & Backing Fabric Zipper (Optional) Yarn Needle & Thread Latex Adhesive Front FaceTufted Cloth + BackingVelvet/Linen + FillingFiberfill = PLUSH PILLOW 1. Design & Tufting: Since pillows are touched frequently, opt for "Cut Pile" to achieve a soft texture. Pastel tones offer a minimalist look, while neon colors create a modern vibe. 2. Securing (Critical Step): Because pillows are flexible, the glue you apply to the back must be flexible. Rigid glues will crack over time. Always use high-quality flexible latex. 3. Assembly: Leave a seam allowance around your tufted piece. Sew it inside out with your backing fabric (velvet is recommended), flip it right side out, and stuff it. 🧶 2. Professional Tufting Rug Construction Floor rugs are the items that endure the most wear and tear. Therefore, durability must be prioritized just as much as aesthetics. EXTRA REQUIREMENTS FOR RUGS: 100% Wool or Acrylic Yarn Non-slip Backing Cloth Rug Binding Tape (Edges) Carving Clippers Design Scale: For large areas, simple and wide patterns (color blocking) make the room look spacious. Complex, tiny patterns can look cluttered on small rugs. Carving & Trimming: For a professional finish, separate color transitions using scissors or carving clippers (V-Cut). This gives the rug 3D depth and definition. Final Backing: You must apply a secondary "Action Back" or "Non-slip Cloth" over the initial glue layer. Just applying glue is not sufficient for a floor rug. 🖼️ 3. Wall Hangings & Art The most modern way to create an artistic atmosphere in your home. Instead of putting the rug on the floor, display it on the wall like a painting. 🪝 D-Rings After gluing felt to the back, sew metal D-rings to hang it on a nail/hook. 🪵 Wooden Dowel Mount a wooden dowel or slat to the top for a modern tapestry look. 🖼️ Framing Stretch and mount your tufted piece inside an empty picture frame. 💡 Pro Design Tip: Abstract "blob" shapes or nature-inspired figures (leaves, sun) are very popular for wall art. Use gold or glitter yarn to create details that sparkle on the wall. 🚀 4. Push the Boundaries: Creative Ideas 🪞 Decorative Mirrors Create a "Tufted Frame" around an ordinary mirror for a bohemian and fluffy decor piece. 🪑 Furniture Upholstery Revamp furniture by covering the seat of an old stool or chair with a custom tufted piece. 🏃 Runner Rugs Design long, narrow, and geometric "Runners" specifically for hallways and corridors. 🧥 Jacket Patches Create small tufted patches and sew them onto the back of denim jackets for a custom look. Tufting is an art form that can transform not just rugs, but every texture in your home.
Learn more
5 Ways to Make Your Tufted Rugs Last Longer (Advanced Care Guide)
Tufted rugs are indispensable parts of decoration with their handmade and artistic values. However, for these special rugs to be long-lasting, they require an advanced care routine different from standard industrial rugs. At GG Tufting, we have compiled 5 professional strategies to keep your handcrafted rugs in their first-day form for years. 🧹 1. The "Gentle Power" Principle in Cleaning Tufted rugs are not as tightly woven as machine-made rugs. Vacuum power and harsh chemicals are their biggest enemies. Do These ✅ Brushless Nozzle: Use only the suction attachment of the vacuum cleaner. Rotating brushes pull out fibers. Blotting: Do not rub if a spill occurs. Press down with a paper towel to absorb the liquid. Lint Roller: Use a sticky lint roller for surface dust and pet hair. Don't Do These ❌ Washing Machine: Never put it in the washing machine. The latex backing will crumble. Harsh Chemicals: Bleach or heavy stain removers will ruin the colors. Shaking: Shaking the rug vigorously can cause the backing to crack. ☀️ 2. Managing Sunlight and Traffic Your rug's enemy is not just dirt; UV rays and foot traffic also age the rug. ☀️ Effect of UV Rays (Simulation) Original Color (Shade) Faded Color (Sun) Rotate your rug 180 degrees every 3-6 months. This ensures both sunlight and foot traffic marks are distributed evenly across the rug. 🧱 3. Reinforcing the Backing The skeleton that holds the rug together is its backing. A backing that loosens over time causes yarn shedding. Re-gluing: If the rug is very old and has softened, a thin layer of fresh latex can be applied under the backing cloth. Binding Tape: Add an extra layer of protection with twill tape to prevent edges from fraying. 💡 Advanced Tip: Always place a quality Rug Pad under your rug. This prevents slipping and absorbs shock when stepped on, delaying the crushing of fibers. 💧 4. The Sneakiest Enemy: Moisture The latex glue used in tufted rugs is sensitive to moisture. High humidity can break down the glue structure, causing it to "crumble" (turn into powder and shed). ⚠️ Bathroom and Kitchen Warning: If you plan to use your rug in these areas, make sure to use water-resistant synthetic yarns (acrylic) and water-resistant special glues. Natural wool yarns trap moisture and can mold. 📅 5. Professional Maintenance Calendar Creating a "care routine" for your rug doubles its lifespan. Weekly Light Vacuuming & Lint Rolling Every 6 Months Rotation Annually Professional Dry Cleaning By appreciating your own handiwork, you can keep your tufted rugs for a lifetime with these methods.
Learn more
Mastering Home Decor with Tufting Rugs: Advanced Styling Guide
Tufted rugs do more than just add color to a room; they define the acoustics, warmth, and character of the space. Handmade and unique designs transform your living area from a standard catalog house into a personal "living gallery." In this article, the GG Tufting design team explores advanced placement strategies and material choices for every corner of your home. 🛋️ 1. Living Room: Heart of the Home The living room is where a tufted rug says, "I'm here!" However, where you place the rug changes how the size of the room is perceived. Advanced Placement Strategies: Front Legs On Makes space feel airy, connects furniture. All Legs On A luxurious and cohesive look. Focal Point: If your furniture is neutral (beige, gray), choose a rug with "art-like" asymmetrical patterns to be the star of the room. Layering: Place a smaller, amorphous colorful tufted rug over a large, solid jute or sisal rug. This creates a bohemian and rich texture. Trend Alert: Layering The secret to creating depth on the floor. Jute/Sisal Base Tufted Rug 🛏️ 2. Bedroom: Comfort and Texture The first thing your feet touch in the morning shouldn't be a cold floor, but a soft tufted rug. Here, texture is more important than pattern. Cut Pile Preference: Definitely use "Cut Pile" and high-pile rugs in the bedroom. This provides a hotel-comfort feel. The Rule of Three: Instead of placing one giant rug under the bed; place two long "Runners" on the sides and one piece at the foot of the bed. This makes cleaning easier and the space look more dynamic. Color Psychology: Instead of vibrant colors, choose "calming" palettes like pastels, earth tones, or cream to contribute to sleep quality. 🚪 3. Hallway and Entry: First Impressions These high-traffic areas are often neglected. However, the key to making narrow spaces look wider is the rug. 💡 Catwalk Effect:In a narrow hallway, use a long "Runner" leaving about 4-6 inches (10-15 cm) of gap at the edges. If the lines in the rug pattern are longitudinal, the hallway will look much longer and infinite. Durability is a Must: For entry areas, definitely use 100% Wool or high-quality Acrylic. The "Loop Pile" technique extends life in these areas as it is more resistant to crushing. Non-Slip: For safety, a "Latex Backing" or non-slip pad must be applied to the back of the rug. 🧸 4. Kids Room: Play Area Children's rooms are the center of imagination. Instead of standard rectangular rugs, use the freedom of tufting. Form Freedom: Design "die-cut" rugs in the shape of a cloud, a rocket, or their favorite animal. Tactile Play: Create surfaces that develop the child's sense of touch by creating areas of different heights (3D Carving) on the rug. Material Warning: Hypoallergenic and dust-repellent yarns (such as quality cotton or special acrylic) should be preferred for children's rooms. 🖼️ 5. Floor to Wall: Acoustic Art Tufting projects aren't just for the floor. The "Wall Hanging" trend has become indispensable for modern homes. Soundproofing: Tufted panels are excellent sound absorbers. Used to soften sound in echoey empty rooms or Home Offices. Gallery Wall: Instead of one large piece, create a collage by hanging 3-4 smaller tufted pieces of different sizes and shapes together. 🍳 6. Kitchen and Bath: Wet Area Solutions Using rugs in damp areas is risky but not impossible. Proper material selection is vital. ✅ PREFERRED 100% Acrylic or Cotton Yarn. Does not absorb water or dries quickly. ❌ AVOID 100% Wool Yarn. Traps moisture, does not dry, and causes odor/mildew over time. *Water-resistant glue must be used as backing for bath mats. Tufted rugs can be the complementary piece of decor in every room.
Learn more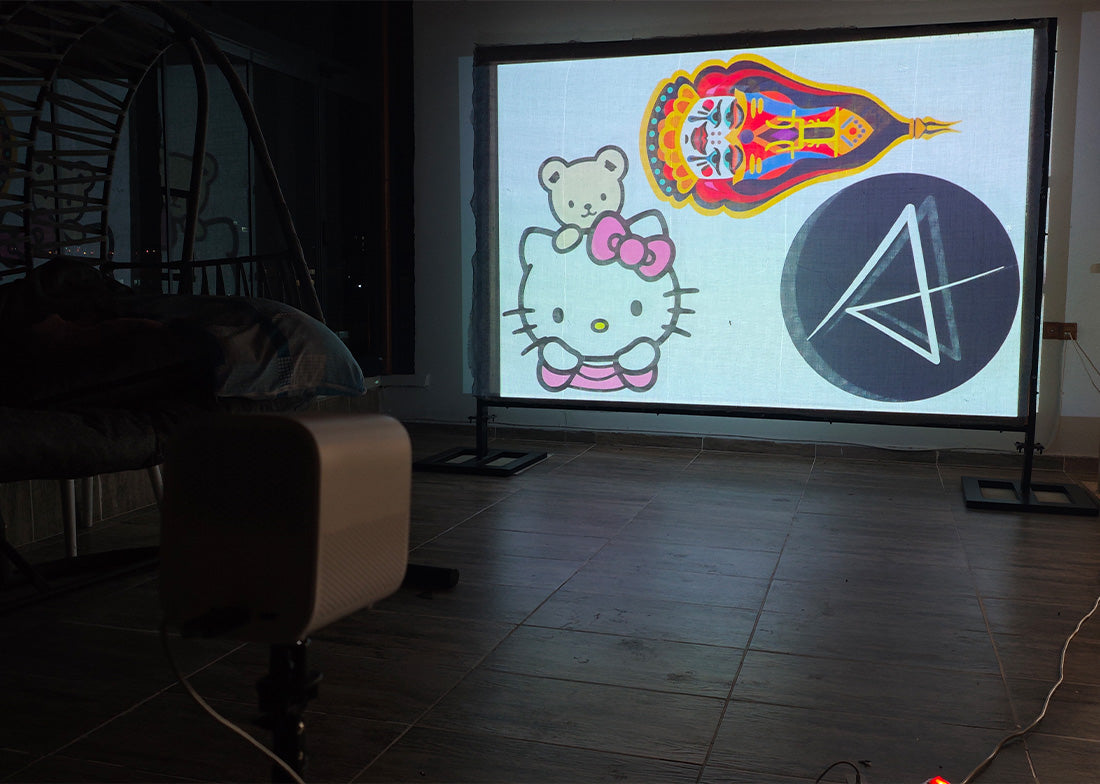
How to Create Tufting Patterns: Master Your Own Designs (Advanced Guide)
If you want to create a unique and personal touch in your tufting projects, designing your own patterns is a great starting point. Moving beyond ready-made templates gives your rugs a completely authentic identity. In this article, we examine the professional pattern preparation process at GG Tufting standards, from inspiration to digital drawing, color palette creation, and transferring designs to fabric. 💡 1. Inspiration Sources & Gathering Ideas Every great design starts with a spark. Professional designers take inspiration not from one place, but from textures around them. 🌿 Nature Organic forms, leaves, and "blob" shapes. 🎨 Abstract Art Minimalist lines and color blocks. 📐 Geometry Bauhaus-style sharp lines and circles. 📌 Pinterest Trend boards and color combinations. 💻 2. The Power of Digital Design Pen and paper is always a classic, but for advanced tufting, digital drawing minimizes errors and makes color testing easier. Software/App Use Case Advantage Procreate (iPad) Hand Drawing & Painting The most popular tool. Perfect for organic drawings with brush support. Adobe Illustrator Vector Drawing Never pixelates (distorts) when enlarged via projection. Canva Collage & Layout Creating patterns with ready-made components without drawing skills. Vector Q (Mobile) Photo to Vector Converts complex photos into simplified lines for tufting. 🎨 3. Color Palette and Yarn Selection Colors define the soul of the design. The color you see on the screen may not always match the yarn color perfectly. Therefore, start by determining a maximum of 4-6 main colors during the design phase. Color Ratio Example: Distributing colors in your design in a balanced way prevents eye fatigue. For example: 50% Main Color, 30% Secondary Color, 20% Accent Color. 🔄 4. The Golden Rule: Mirroring Since we work on tufting rugs from the back (reverse), the design must look correct when viewed from the front of the frame. Therefore, before transferring your design to the fabric, you MUST FLIP IT HORIZONTALLY. DESIGN VS. RESULT Drawing on Computer HELLO ➡️ Drawn on Fabric HELLO If you skip this step, especially in designs containing text, the writing will be read backwards when the rug is finished! 📽️ 5. Methods for Transferring Design to Fabric Projector (Most Professional): Project your digital drawing onto the wall-mounted frame and trace over it with a marker. The margin of error is zero. Freehand Drawing: Draw directly on the fabric with a permanent marker for simple and organic shapes. Stencil Cutting: Print on large paper, cut out the shapes, and outline them on the fabric. 🚀 6. Professional Design Tips Negative Space: You don't have to fill the entire rug. Sometimes, shaped rugs (non-rectangular designs where you cut around the shape) look more modern. Margins: Stay at least 2–4 inches (5-10 cm) inside the frame edges when drawing your design. Working too close to the edge is difficult, and the fabric doesn't stretch properly there. Complexity Control: A tufting gun is not a pen. Very fine details (smaller than 0.4 inches / 1 cm) and micro-text get lost in the rug. Simplify the design. Creating your own designs is the most enjoyable way to master the art of tufting.
Learn more